4 Simple Methods + Shortcuts for Renaming a Sheet in Excel
Keeping your data structured in an Excel file is simple by using numerous worksheets. You may, for instance, have multiple sheets for various locations, months or years, projects, etc.
And occasionally you might need to update the titles of the sheets you’re working with.
I’ll demonstrate a few quick techniques to rename a sheet in Excel in this article (including a keyboard shortcut).
Additionally, check out the part on using VBA to achieve this (it’s not difficult) if you want to rename all the sheets at once (for example, by adding a prefix or suffix to all the sheets).
Then let’s get going!
This instruction explains:

1. Sheets Can Be Renamed with a Simple Double Click
2. With a Keyboard Shortcut, rename sheets
3. Rename Sheets Using the Ribbon's Format Option
4. Add Prefix/Suffix to All Sheet Names Using VBA to Rename Sheets
5. Excel's sheet naming conventions
1. Sheets Can Be Renamed with a Simple Double Click
The simplest approach to renaming a sheet in Excel is to use the mouse.
The steps to rename a sheet using a mouse double-click are as follows:
- To rename a sheet tab, place your cursor over it.
- Click on it twice. By doing this, the sheet name will enter edit mode.
- Type the desired sheet’s name in the box provided.
- Enter the word (or click anywhere in the worksheet)

You must follow the procedures listed above for each sheet you want to rename.
Additionally, when in edit mode on the tab, you may move the cursor by using the arrow keys to add a prefix or suffix to the sheet name. Put the cursor where you wish to add the text and type by hand.
2. With a Keyboard Shortcut, rename sheets
You may also use the following keyboard shortcut if you want to type and don’t want to use a mouse merely to rename a sheet (for Windows).
ALT + O + H + R
These keys must be pressed sequentially, one after the other.
Even though it’s not a simple keyboard shortcut, you could discover that it’s a better approach to rename Excel sheets once you get used to it.
A Pro Tip: You may use the keyboard shortcut Controls + PageUp/PageDown to advance to the next sheet by holding down the Control key while pressing the Page UP or Page down key, depending on which sheet you wish to travel to.
3. Rename Sheets Using the Ribbon’s Format Option
The Excel ribbon also provides access to the option to rename sheets:
- On the Home tab, click
- Click the “Format” link in the Cell group.
- Select “Rename Sheet” from the menu. By doing this, the sheet name will enter edit mode.
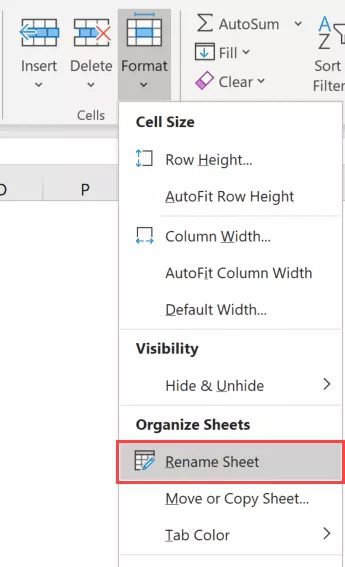
- Put the name you wish to appear on the sheet here.
You could only modify the name of the current sheet using this approach. You must first activate the other sheet to alter its name, and then follow the instructions above.
Although this option is available, I usually choose to change the sheet’s name using a mouse double-click.
4. Add Prefix/Suffix to All Sheet Names Using VBA to Rename Sheets
You might occasionally need to prefix or suffix each sheet in your worksheet.
While if you simply have a few worksheets, you may accomplish this manually (using the techniques given above). However, if you have a large number, this may be time-consuming and prone to mistake.
In this situation, you may quickly do this using a straightforward VBA code in the current window.
The VBA code that will prefix all sheet names with “2020 -” is listed below:
For Each sh In Worksheets: sh.Name = "2020 - " & sh.Name: Next sh
The code above iterates over each page in the workbook using a VBA loop (the For Next loop) and modifies the name by prefixing it with the given prefix.
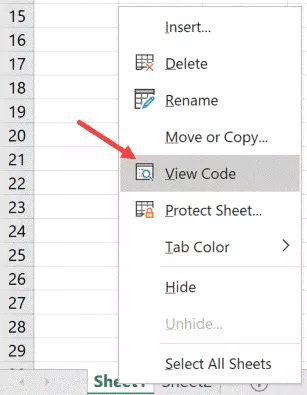
The instructions to utilize this VBA macro code in Excel are as follows:
- On any of the sheet tabs, right-click.
- Select View Code. This will launch the backend of the Visual Basic Editor.
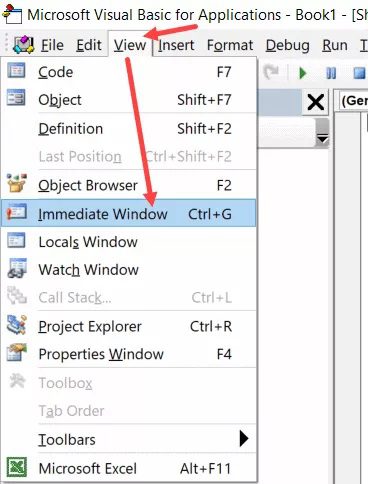
- Select Immediate Window from the menu by selecting the ‘View’ option in the VB Editor window. This will cause the present window to appear. If the immediate window is already visible, there is no need to do this step.
- The code above should be copied and pasted into the current window.
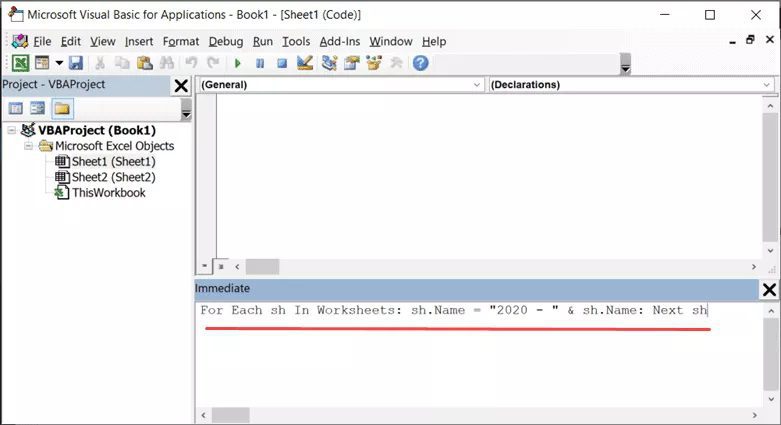
- Put the cursor at the line’s conclusion.
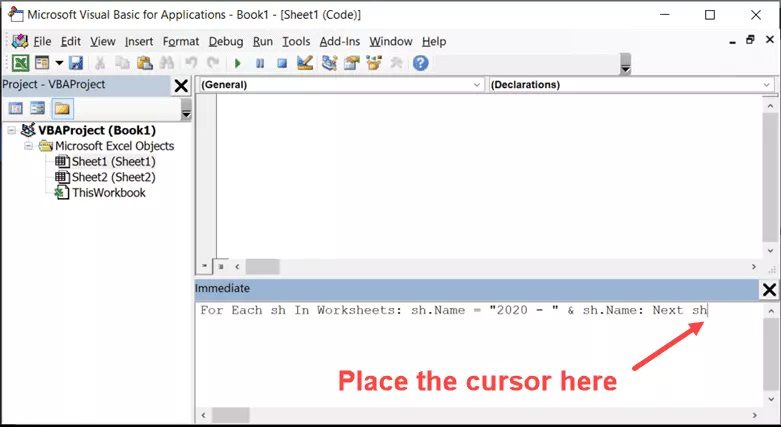
- Press the Enter key.
When you press the Enter key, the code is immediately performed and the desired prefix is added to all sheet names.
Be aware that this will rename every sheet, both visible and hidden.
Similarly to that, you can use the code below to append a suffix to all of the sheet names:
For Each sh In Worksheets: sh.Name = sh.Name & " - 2020": Next sh
You may even go one step further and alter the names of select particular sheets (let’s say only those that contain the word 2020). The code may be changed to accomplish this quickly.
5. Excel’s sheet naming conventions
There are various name conventions you must adhere to when renaming a sheet in Excel:
- The length of a sheet name is limited to 31 characters.
- The name of a sheet cannot be left empty.
- Two pages bearing the same name are not permitted.
- The sheet name cannot begin or finish with an apostrophe (‘). However, you may incorporate it into the sheet name somewhere in the middle.
- When renaming the sheet in Excel, you are not permitted to use the following characters: [ ] \ /? : *
This implies that you are unable to have a sheet name that has a date and a forward slash. For instance, the sheet name 01/01/2020 is invalid whereas 01-01-2020 is OK.
6. The sheet History cannot be given a name since Excel uses it internally.