3 Simple Ways to Indent in Excel ( Keyboard Shortcut)
By default, Excel aligns text rings in a cell to the left and numbers to the right.
You also have the choice to indent the content of the cell if you feel that the numbers or sentences are too near to the cell boundary. In a cell, you can indent to the left or the right.
If you think the numbers or words are too close to the cell boundary, you may alternatively choose to indent the cell’s content. You can indent to the left or the right in a cell.
This instruction explains:
1. Using a Keyboard Shortcut to Indent
2. Using the Ribbon Options, indent
3. Individual Lines in the Same Cell Are Indented
1. Using a Keyboard Shortcut to Indent
Let’s say you wish to aim the numbers a little bit to the right and you have the data set depicted below.
The keyboard shortcut for that is as follows:
ALT + H + 6 (to indent to the right)
ALT + H + 5 (to indent to the left)
Select the cells where you wish to apply the indent, then hit these keys consecutively to activate this shortcut (one after the other).
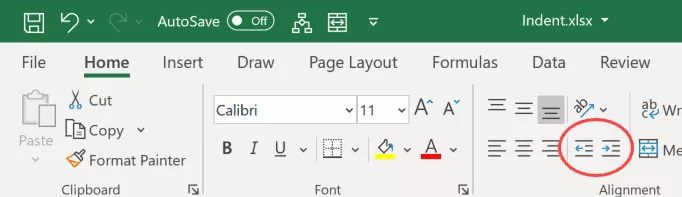
2. Using the Ribbon Options, indent
Excel provides settings on the ribbon where you may indent with a click of a button if you’d rather use the mouse.
The steps to indent using the ribbon choices are as follows:
- Choose the cells to which you wish to add an indentation.
- On the Home tab, click
- Click on the indent icons in the Alignment group (based on whether you want to indent left or right)
The entire cell content is indented, as you can see. Therefore, all of the lines in a cell that include multiple lines would be indented.
You may also add the indent icons to the Quick Access Toolbar
if you frequently need to modify the indentation. Just choose
"Add to Quick Access Toolbar" from the context menu
when you right-click on the indentation icon.
Fun fact: Excel indents by the same amount as three space characters when you use these options.
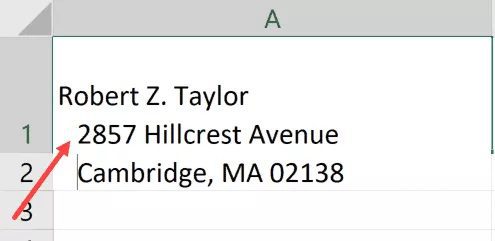
3. Individual Lines in the Same Cell Are Indented
If a cell has many lines, you might wish to indent some of the cells but not the others.
Unfortunately, employing the indenting choices described above will prevent you from doing that. The indent options are disabled once you enter edit mode in a cell.
However, there is a less-than-elegant workaround that may be used to do this. This may be accomplished by manually inserting spaces before the lines in which you wish to add indents.
Assume you wish to indent every line following the first one in the dataset as it is displayed below.
The steps to indent numerous lines in a single cell are as follows:
- Choose the cell.
- Click the cell twice (or press F2 to get into the edit mode)
- Set the cursor to the desired indentation location.

- To create the necessary indentation, use the space character.
If you want the indentation to span many lines, you must position the cursor at each line and add the necessary letters for a space.
These are a few techniques for indenting text in Excel.
I sincerely hope this instruction was helpful.