How Can I Get The Sheet Name In Excel? Simple Formula
You might occasionally need to acquire the worksheet name while dealing with Excel spreadsheets.
Although you may always manually enter the sheet name, if the name changes, nothing will change.
Therefore, you can use a straightforward formula in Excel to obtain the sheet name so that it automatically changes when the name is updated.
In this lesson, I’ll demonstrate how to use a straightforward formula in Excel to obtain the sheet name.
This tutorial explains

1. How to use the CELL function to get the sheet name.
   1.1 A Different Formula to Retrieve the Sheet Name (MID formula)

2. Getting the Name of the Sheet and Adding Text to it
MS EXCEL VBA TUTORIAL
1. How to use the CELL function to get the sheet name.
With Excel’s CELL function, you may rapidly learn more about the cell that the function is being applied.
As a result of the formula, this function also enables us to obtain the whole file name.
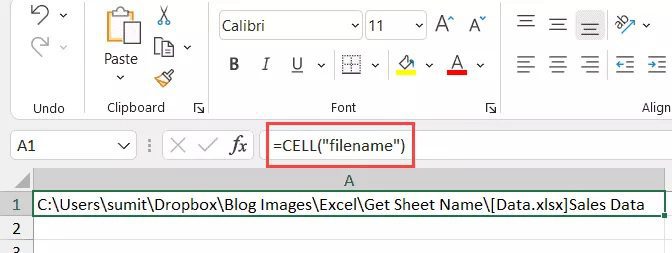
Suppose I have a sheet called “Sales Data” in an Excel spreadsheet.
The formula I used in any cell in the “Sales Data” worksheet is listed below:
=CELL("filename"))

As you can see, it provided me with the complete file’s URL, which is where I am applying this formula.
However, I just required the sheet name and not the entire file location.
So, for this formula to extract only the sheet name, we will need to combine it with a few additional text formulae.
The formula that, when used in any cell in that sheet, will only return the sheet name is listed below:
=RIGHT(CELL("filename"),LEN(CELL("filename"))-FIND("]",CELL("filename")))
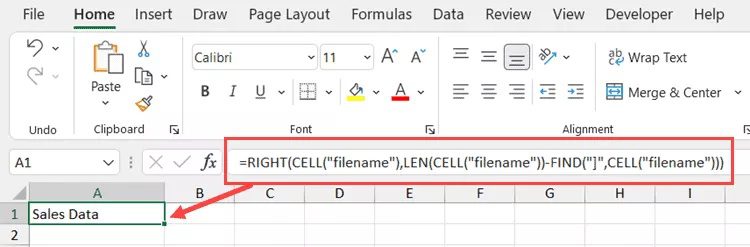
In any case, the aforementioned formula will yield the sheet name. The nicest thing is that if you changed the file name or the sheet name, it would update immediately.
MS EXCEL VBA TUTORIAL
Keep in mind
That the CELL formula only functions if the workbook has been saved.
It would return a blank if you hadn't (as it has no idea what the workbook path is)
Curious about how this formula functions? I’ll explain!
The entire workbook address and the sheet name are provided by the CELL formula at the end.
The sheet name should always come after the square bracket, for example (]).
Using this information, we can determine where the square bracket is located and then extract everything that follows (which would be the sheet name)
And this formula accomplishes it.
The formula’s FIND step searches for the character “]” and returns its location (which is a number that denotes the number of characters after which the square bracket is found)
We utilize the square bracket’s location in the RIGHT formula to extract anything that comes after it.
The dynamic nature of the CELL formula is a significant drawback.
As a result, if you use it in Sheet1 and then go to Sheet2,
Sheet1's formula will update and display Sheet2 as the name (despite the formula being on Sheet1).
This occurs because, regardless of where a cell is located inside a workbook,
the CELL formula assumes it to be on the active sheet and provides the name for that sheet.
If you wish to update the CELL formula in the active sheet,
a workaround is to use the F9 key. This will necessitate a new calculation.
MS EXCEL VBA TUTORIAL
1.1 A Different Formula to Retrieve the Sheet Name (MID formula)
In Excel, the same thing may be accomplished in a variety of ways. Additionally, there is another recipe that is as effective in this situation.
It utilizes the MID function rather than the RIGHT function.
MS EXCEL VBA
The formula is as follows:
=MID(CELL("filename"),FIND("]",CELL("filename"))+1,255)
This formula works like the RIGHT formula, where the square bracket position is first determined.
The information following the square bracket is then extracted using the MID function.
2. Getting the Name of the Sheet and Adding Text to it
If you’re creating a dashboard, you might wish to add text before or after the worksheet name in addition to just getting its name.
For instance, if your sheet is called 2021, you could want the outcome to be “Summary of 2021.” (and not just the sheet name).
This is simple to do by using the ampersand operator to combine the formula we saw earlier with the text we want before it.
The following formula will place the phrase “Summary of” before the sheet name:
="Summary of "&RIGHT(CELL("filename"),LEN(CELL("filename"))-FIND("]",CELL("filename")))
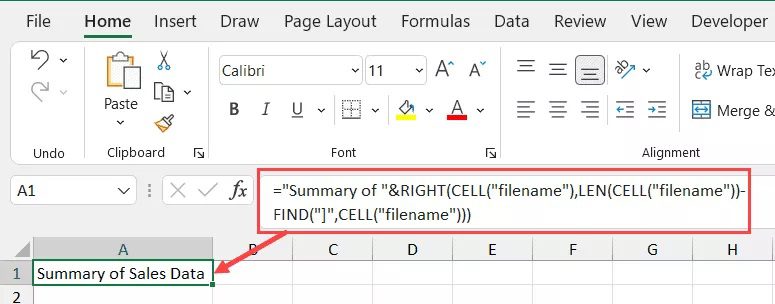
The text preceding the formula and the formula’s output is simply combined using the ampersand operator (&). Instead of using an ampersand, you may alternatively use the CONCAT or CONCATENATE function.
The same ampersand logic may be applied if you wish to add any text following the formula (i.e., have the ampersand after the formula followed by the text that you want to append).
Therefore, you may use these two straightforward formulae to obtain the sheet name in Excel.