How to Enable AutoSave in Excel (An Easy Guide)
Even while Excel has been getting better with each new release, it still tends to crash occasionally (particularly if you’re dealing with a big dataset).
And occasionally, it could have nothing to do with Excel at all, such as a power outage or your computer stopping due to a problem unrelated to Excel.
Excel features an AutoSave tool that, as the name implies, will automatically save your work in such circumstances to ensure that you don’t lose your data.
Excel will automatically save your work if autosave is set, ensuring that you don’t lose a lot of it (at max a few minutes of work can be lost).
In this video, I’ll go over all you need to know about Excel’s AutoSave feature, including how to enable it.
It should be noted that AutoSave is a new feature in Office365 that enables real-time saving whenever files are stored on OneDrive or SharePoint. If you’re using an earlier version (Excel 2010/2013/2016/2019), you have the Save AutoRecover Information feature, which doesn’t save your work instantly but does so periodically.
This instruction explains:
1. AutoRecover vs. AutoSave
2. Excel's Options dialogue box is where you turn on AutoSave.
3. AutoSave being added to QAT (for Office 365)
4. Problem with AutoSave (Save As vs. Save a Copy)
5. Using third-party tools like Google Drive or DropBox
6. Using VBA, automatically save the file before closing
1. AutoRecover vs. AutoSave
While AutoRecover was included in earlier versions as well, AutoSave is a new function in Excel Office 365.
When you save your Excel files in OneDrive or SharePoint, AutoSave enables you to save your progress in real-time.
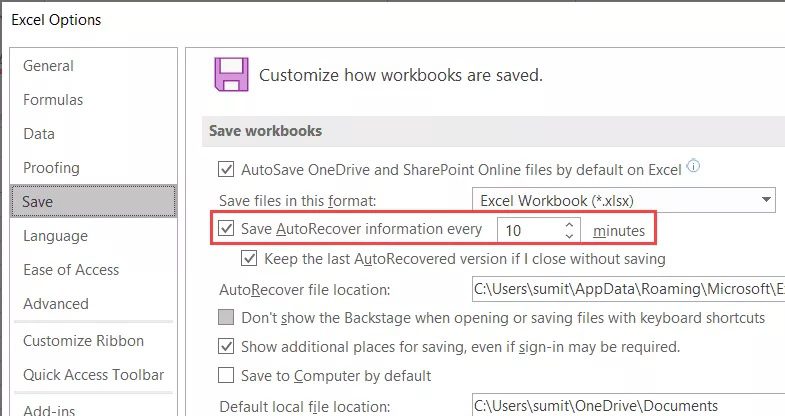
Instead, you may choose to have your work automatically saved every 10 minutes by using the ‘Save AutoRecover Information’ option (or whatever period you specify). When this option is turned on, a temporary duplicate of your work will be kept and saved repeatedly every ten minutes.
You can still recover the temporarily saved file if your machine crashes suddenly (using the Autorecover feature).
I’ll go through both of these features in this lesson.
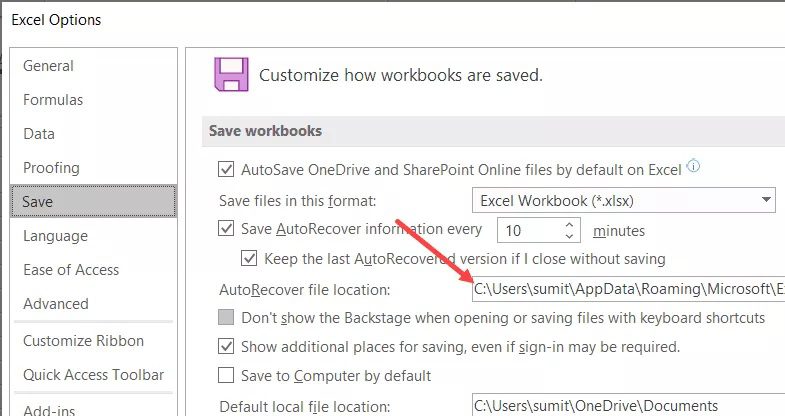
2. Excel’s Options dialogue box is where you turn on AutoSave.
In Excel’s Options dialogue box, you may activate AutoSave and Save Auto-Recover Information to automatically save files at certain intervals. This will then be activated for all of the workbooks you use on that system.
Keep in mind that customers of Office365 are the only ones who can utilize AutoSave. Only AutoRecover is available without O365.
The steps to enable Auto-save in Excel are as follows:
- Go to the File tab.
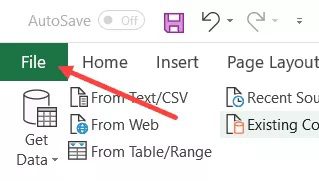
- Activate the File tab.
- Click the Save button on the left in the Excel Options dialogue box.

- The “Save AutoRecover information every” checkbox should be selected. The value is set to 10 minutes by default, but you may change it to a lower or higher number if you want.
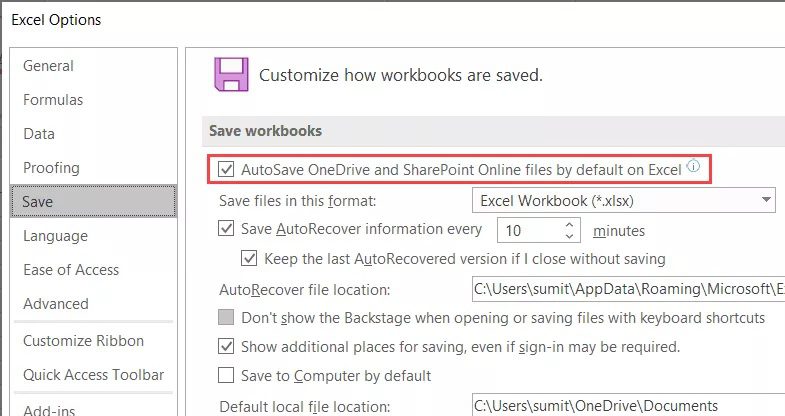
- Select “AutoSave OneDrive and SharePoint Online files by default in Excel” from the drop-down menu. This option only works with Office 365 and instantly saves your work (every few seconds)
- Ok
By following the preceding instructions, your work will be automatically saved every ten minutes.
Keep in mind that your files must be in the most recent file format for “AutoSave OneDrive and SharePoint Online files by default in Excel” to function (i.e., XLSX and not XLS).
Added beneficial choices you have are:
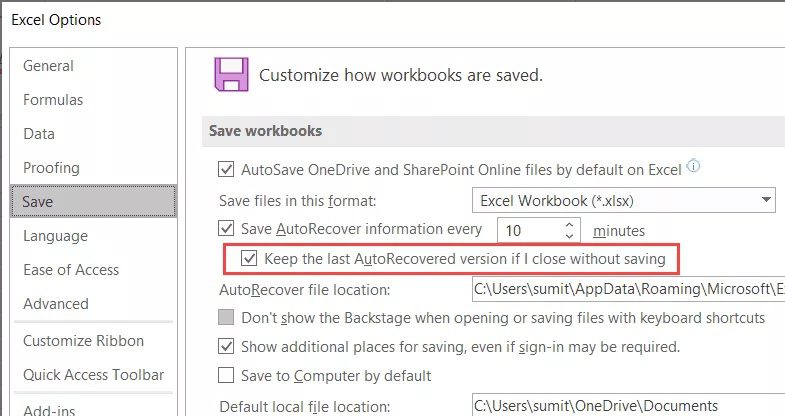
- Even if I close without saving, keep the most recent Auto Recovered version: Enabling this option will guarantee that you don’t lose any work within the 10 minutes that Excel saves your work (when AutoSave is enabled) (in case your system crashed or there is a power failure). When activated, Excel will provide the option for automatic file/data recovery.
- Location of AutoRecover File: When Excel saves unfinished files, it saves them here. If you’d like, you may alter this place. You might not be able to alter this if you’re not the administrator.
When AutoSave is turned on (with files stored on Onedrive or SharePoint), you won’t get a warning when you end the document to save any changes that haven’t been saved (since these changes are being saved every few seconds).
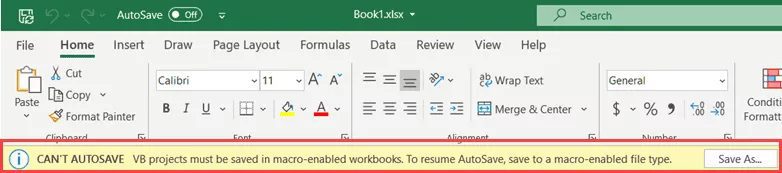
Additionally, if you add VB Code (a macro) to the file, AutoSave will halt and urge you to save it as a Macro-enabled file (.xlsm format)
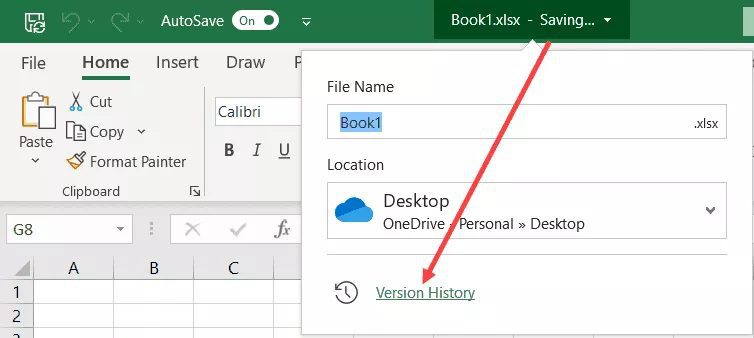
Users of Excel may now exchange files and make changes in real-time thanks to AutoSave. Additionally, if you like, you may view the version history and return to any earlier version. When you use version history to access an old file, it will be opened as Read-Only, but you may choose to save it under a different name if you’d like.
3. AutoSave being added to QAT (for Office 365)
Additionally, you may include the AutoSave option in the Quick Access Toolbar if you use OneDrive or SharePoint (available only in Office 365).
This toggle option allows you to quickly enable autosave (in OneDrive or SharePoint).
Although I discovered that it came pre-installed with my Office365 subscription, if you don’t already have it, you may add
AutoSave to the Quick Access Toolbar by following the instructions below:
- The Customize Quick Access Toolbar icon should be clicked.
- Select Automatically Save by clicking.
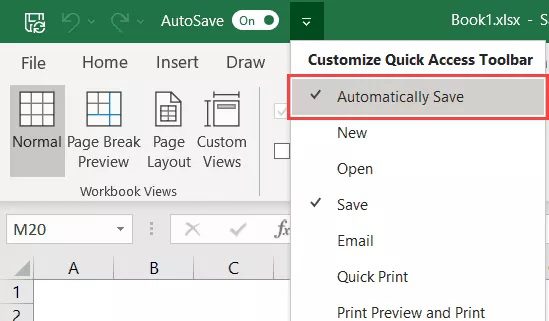
If the option to “Automatically Save” is missing from the drop-down menu, choose “More Command” and then “Excel Options” to add the AutoSave option to the QAT.
4. Problem with AutoSave (Save As vs. Save a Copy)
You’ll note that the “Save as” option is gone after turning on AutoSave and saving the file to OneDrive or SharePoint. Instead, the ‘Save a Copy’ option is shown (more on this here)
It won’t be feasible to make changes and save the document as a new one while AutoSave is set and saving your work every few seconds.
You will have both the original file and the new file with the most recent 20 minutes of work, for instance, if you start with an old file, work on it for 20 minutes, then save a copy. But since AutoSave is activated and is storing your work every few seconds, this is not feasible.
Because of this, you now have the option to “Save a Copy,” which you may use to make a copy before making changes.
You will still see the ‘Save As’ option if your Excel files are not on OneDrive or SharePoint.
5. Using third-party tools like Google Drive or DropBox
With cloud storage services like Dropbox and Google Drive, you can also access the version history options for Excel files.
This equipment simply checks to see whether the file has changed, then saves the previous version. Then, if you’d like, you may return to these earlier versions.
Having access to individuals who don’t use OneDrive makes it simple to collaborate with them when you utilize these third-party solutions.
When dealing with teams or clients that utilize Google Drive or Dropbox instead of OneDrive, this is helpful because many people prefer such services over OneDrive.
The sole restriction is to avoid storing sensitive information on these cloud storage services.
6. Using VBA, automatically save the file before closing
The incredible AutoSave function makes working with Excel much less stressful because you know the data won’t be lost.
You will need to rely on Excel’s AutoRecover function if you don’t have Office 365, which also means you don’t have the AutoSave option.
Another choice is to use a straightforward VBA code to ensure that your file is saved before you shut it. By doing this, you can prevent losing your work as a result of closing the file before storing it.
Note: Only if you don’t use Office 365 with OneDrive or SharePoint would utilizing this make sense. If you make a mistake, you can always revert to an earlier version, and your data are immediately preserved nevertheless.
The steps to use VBA to save a file before quitting the worksheet are as follows:
- Open the worksheet in which this VBA code should be enabled to save before closing.
- Press the F11 key while holding down the ALT key (on a Mac, Command + Option + F11). The VB Editor is then shown.
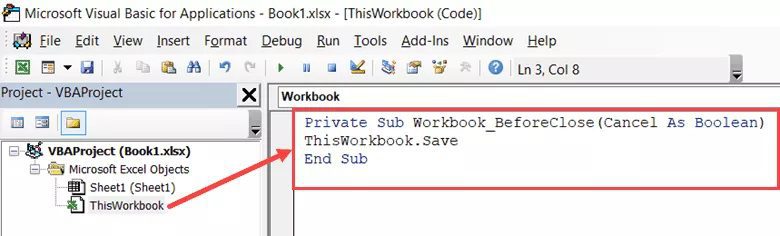
- Double-click the ThisWorkbook object in the Project Explorer for the file where you wish to put this code.
- the ThisWorkbook code window by copying and pasting the code below:
-
Private Sub Workbook_BeforeClose(Cancel As Boolean)
ThisWorkbook.Save
End Sub
- Shut off the VB Editor.
Now, this code will be executed the first time a worksheet changes and you close it without saving (as this is a VBA Event that runs based on an event – which is workbook closing in this case). This code will dismiss the worksheet when it has been saved.
This will display a window asking you to choose the place where the file should be saved if you haven’t already done so.
You can change the code to save the file with a timestamp if you don’t want to overwrite your current file. You may even go back to a prior version and ensure that your effort is not lost in this manner.
The VBA code to save the file with the date and time stamp in the filename is provided below:
Private Sub Workbook_BeforeClose(Cancel As Boolean)
wbname = ThisWorkbook.Name
timestamp = Format(Now, "dd mmm yy-hhmmss")
ThisWorkbook.SaveAs timestamp & wbname
End Sub
By doing this, the new file will be stored in the same place as the old file with a timestamp in the name. You may specify a folder in the code where you want the file to be saved if you choose.
So that’s everything you need to know about turning on AutoSave in Excel and making effective use of it. Additionally, even if you don’t have AutoSave because you don’t use Office 365, you can still set up AutoRecover and retrieve any lost data. Additionally, the VBA code may be used to guarantee that the files are automatically saved as a copy when you shut it.